Understanding Frozen Shoulder and the Road to Recovery

What is Frozen Shoulder?
Frozen shoulder, also known as adhesive capsulitis, is a condition that causes stiffness and pain in the shoulder joint, significantly limiting movement. It typically progresses through three stages: freezing, frozen, and thawing, each with varying levels of pain and limitations.
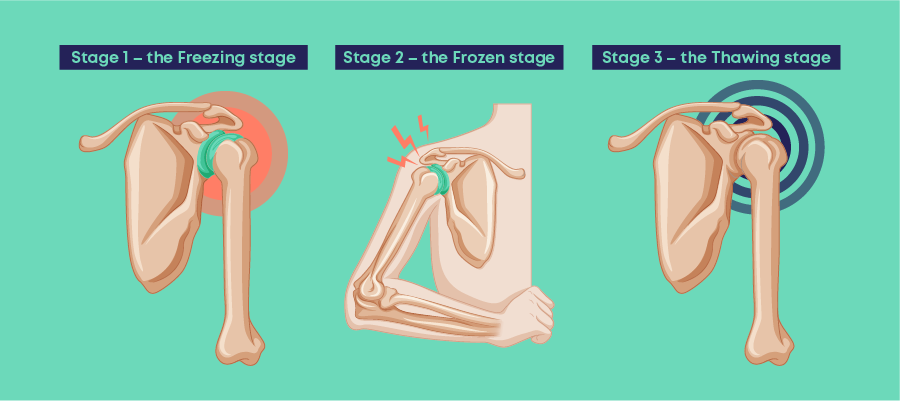
Freezing Phase:
The freezing phase, also known as the painful phase, is the initial stage of frozen shoulder. It’s characterized by a gradual onset of pain in the shoulder, often described as a dull ache or sharp pain, that worsens over time. This pain can be present even at rest and often intensifies at night, making sleep difficult.
During this phase, the shoulder joint also progressively loses its range of motion. This means it becomes increasingly difficult to move your arm in all directions, impacting daily activities like reaching overhead, dressing, and maintaining personal hygiene.
The freezing phase of frozen shoulder typically lasts anywhere from 6 weeks to 9 months. It’s important to note that this is a general timeframe, and the experience can vary significantly from person to person.

Here are some key points to remember about the freezing phase of frozen shoulder:
- Symptoms: Gradual onset of pain, worsening over time, often worse at night; progressive loss of shoulder movement.
- Duration: 6 weeks to 9 months (average)
- Treatment: Focuses on pain management with rest, ice, pain medication, and gentle stretching exercises as tolerated.
If you are experiencing any of the symptoms of the freezing phase of frozen shoulder, it’s important to consult a healthcare professional for proper diagnosis and treatment. Early intervention can help manage pain, prevent further stiffness, and improve your overall recovery.
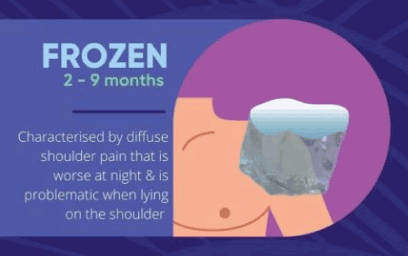
Frozen Phase
Following the initial “freezing” stage, the frozen stage of frozen shoulder marks a transition where:
- Pain: While the intense pain from the freezing stage may begin to gradually improve, it doesn’t necessarily disappear completely. You may still experience some discomfort, particularly with movement.
- Stiffness: The key characteristic of this stage is the significant decrease in the range of motion in your shoulder joint. This stiffness significantly impacts daily activities, making even simple movements like reaching behind your back or combing your hair extremely difficult.
- Duration: The frozen stage typically lasts around 4 to 6 months, although it can vary depending on the individual.
It’s important to consult a healthcare professional during this stage to develop a personalized treatment plan to manage the remaining pain and gradually improve your shoulder’s range of motion. This usually involves physical therapy with gentle stretching exercises and other interventions to promote flexibility.
Thawing phase
The thawing stage is the final stage of frozen shoulder, offering a sense of hope and progress after the challenges of the previous phases. It’s characterized by:
- Decreased stiffness: This is the most welcome change in this stage. You’ll gradually start to notice increased flexibility in your shoulder, allowing for a wider range of motion. This improvement can be slow but steady, allowing you to resume activities that were previously difficult or impossible.
- Reduced pain: While some discomfort might persist, the intensity of pain typically diminishes significantly compared to the earlier stages.
- Regaining movement: As your shoulder loosens, you’ll be able to gradually regain lost movement. This allows you to perform daily tasks and activities with greater ease and confidence.

The thawing stage can last anywhere from 6 months to 2 years. It’s important to continue with your prescribed treatment plan, usually involving physical therapy and gentle stretching exercises, throughout this stage to optimize your recovery and prevent setbacks.
Remember, the timeframe for each stage can vary significantly from person to person. Consulting a healthcare professional for regular monitoring and guidance is crucial to ensure optimal recovery from frozen shoulder.
Diagnosis of Frozen Shoulder:
Diagnosing frozen shoulder typically involves a combination of:
- Medical history: Your doctor will inquire about the nature of your pain, its onset, severity, and any aggravating or alleviating factors. They will also ask about your medical history and any previous injuries or conditions that might contribute to the shoulder pain.
- Physical examination: The doctor will carefully examine your shoulder, assessing its range of motion, tenderness, and any signs of inflammation. Specific tests like passive and active range-of-motion assessments can help determine the degree of stiffness.
- Imaging tests: X-rays are usually the first imaging test performed to rule out other potential causes of pain, such as fractures or arthritis. Magnetic resonance imaging (MRI) may be considered in specific cases to gain a clearer picture of the soft tissues within the shoulder joint and rule out other conditions.
Treatment of Frozen Shoulder:
Treatment for frozen shoulder primarily focuses on managing pain and gradually restoring your shoulder’s range of motion.
Here’s a breakdown of common treatment options:
Non-surgical approaches:
- Pain Management:
- Rest: Avoiding activities that exacerbate pain is crucial.
- Medication: Over-the-counter pain relievers like ibuprofen or acetaminophen can help manage pain.
- Ice therapy: Applying ice packs to the affected area for 15-20 minutes at a time, several times a day, can help reduce pain and inflammation.
- Corticosteroid injections: Injecting corticosteroids directly into the shoulder joint can provide targeted pain relief and inflammation reduction.

- Physical therapy:
- Gentle stretching exercises: A physical therapist can design a personalized program consisting of gentle stretches to improve flexibility and range of motion. These exercises should be performed gradually and with proper guidance to avoid further injury.
- Strengthening exercises: As your range of motion improves, incorporating strengthening exercises can help stabilize your shoulder joint and prevent future problems.
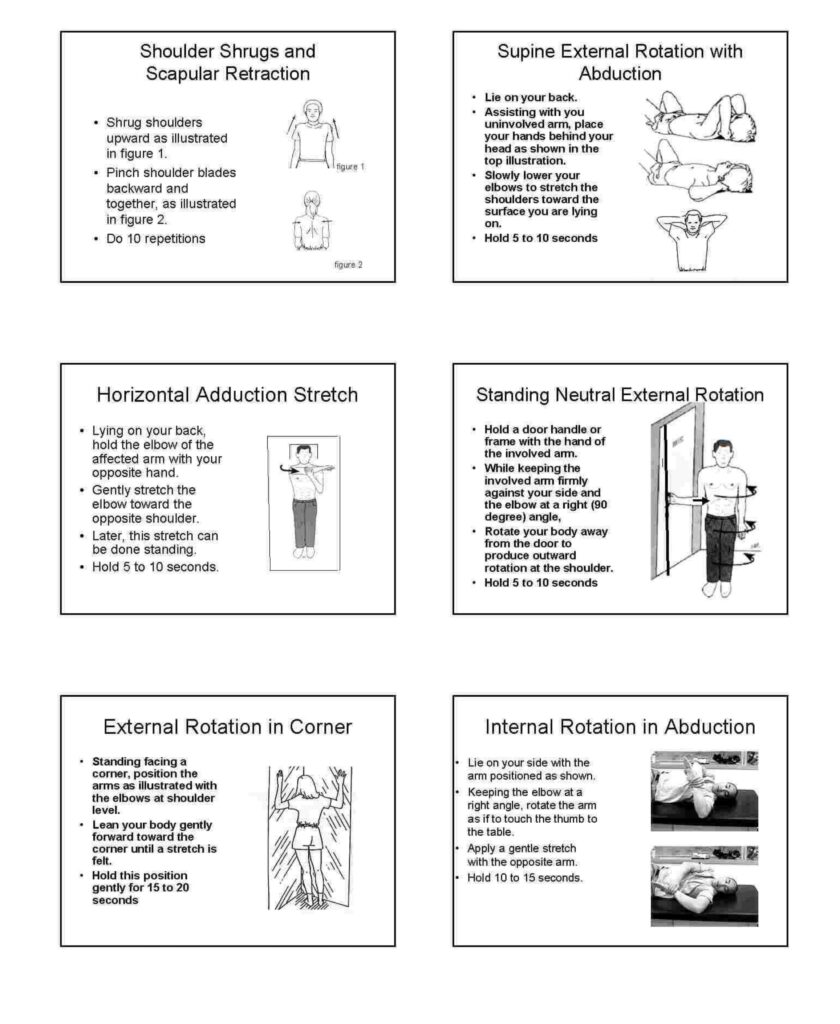
Gentle Stretches for Improved Shoulder Mobility
This guide offers a series of gentle exercises to maintain shoulder mobility and potentially prevent further stiffness. Remember, always prioritize comfort:
General Instructions:
- Perform each exercise slowly and hold at the end point for a few seconds.
- Release the stretch slowly and repeat. Do not force any movement through pain.
- Follow the illustrated instructions for each exercise.
Starting Exercises (7-10 days):
These initial exercises are generally easier to perform and cause minimal to no discomfort:
- Pendulum Exercise: Swing the affected arm gently back and forth, letting gravity guide the movement.
- Tabletop Slides: While lying on your back, slide your hand along a flat surface like a table, slowly progressing towards your head.
- Supine Neutral External Rotation Stretches: Lie on your back and gently rotate your affected arm outwards with the elbow bent at a 90-degree angle.
Adding Exercises (5-6 days interval):
If pain improves after the initial exercises, gradually introduce new ones, adding one every 5-6 days in this order:
- Wall Climbing or Supine Passive Forward Flexion: Gradually raise your arm up a wall or toward your ceiling while lying down, assisted by your unaffected arm or gravity.
- Internal Rotation Behind the Back: Gently reach your affected hand behind your back and grasp your elbow with your other hand, pulling it slightly inwards.
- Supine External Rotation with Abduction: Lie on your back and raise your arm slightly off the ground, then gently rotate it outwards with the elbow bent.
- Horizontal Adduction Stretches: While holding a light weight or object, gently pull your arm across your body towards your chest.
Advanced Exercises (optional):
When shoulder mobility improves further, you may consider these exercises under professional guidance:
- Standing External Rotation: Stand and hold onto a stable object, then rotate your affected arm outwards with the elbow bent.
- External Rotation in the Corner: Stand in a corner and rest your forearm on the wall, allowing your upper arm to hang down and rotate slightly outwards.
- Internal Rotation in Abduction Stretches: Raise your affected arm slightly to the side and gently reach across your body with your other hand to pull your arm inwards.
Important Note: Stop any exercise that worsens pain or tightens your shoulder. If pain persists, consult a healthcare professional for further evaluation and guidance.
How To Do It ?

Surgical approaches:
In rare cases where conservative treatment fails to provide significant improvement, minimally invasive surgical options like arthroscopy might be considered. This procedure involves using a small camera and specialized instruments to break down scar tissue and improve shoulder movement.
Important note: It’s crucial to remember that the optimal treatment plan for you will depend on the severity of your condition, your overall health, and your response to different therapies. Always consult a qualified healthcare professional for diagnosis and guidance on the most suitable treatment approach for your individual case.
Conclusion
Remember, these exercises are tools to assist in your recovery, but they are not a replacement for professional medical advice. Always consult your doctor or physical therapist before starting any new exercise program, especially if you have any concerns or limitations. Consistent practice, combined with professional guidance, can help you improve your shoulder mobility and regain a wider range of motion.